Website Setup DIY - Build a Multifunctional Static Site in Three Days
Summary
- Introduction
- Who Is It For?
- Disclaimer
- How Web Hosting Works (Background Knowledge)
- Architecture Explanation
- Deploying the Website (GitHub Pages)
- Private Domain (Squarespace)
- Static Site Generator (Jekyll)
- Third-Party Plugins (Optional)
- Other Custom Features
- Thoughts on Architecture Design
- Closing Remarks
Introduction
This article will introduce how to quickly build a multifunctional static website using GitHub Pages and Jekyll. You might ask, what is a multifunctional static website? Well, the site you’re viewing now is one! Other examples include blogs, company websites, open-source software documentation, event websites, all of which can be made in the form of static websites.
- Time Cost: For this blog, it took me about 4-5 hours to complete, including buying a domain, setting up GitHub Pages, using a Jekyll template, and creating the blog content.
- Monetary Cost: If you want a specific domain name, it costs about $10-20 USD/year. If you don’t buy a domain, the cost is zero🙂.
Who Is It For?
- People who want to set up a simple website by themselves
- Those who want to understand how websites work behind the scenes
My loyal fans
Disclaimer
This article focuses on the general structure and some execution details but is not a step-by-step tutorial. Additionally, if you truly want to build a website on your own, you still need to have some basic concepts of programming and environment setup, or at least be ready to learn actively and search for information online. If you lack the concepts or mental preparation, I recommend using other paid solutions such as WordPress, Wix, Squarespace, or hiring a freelance developer, otherwise, doing it yourself might be quite tough 🥺
How Web Hosting Works (Background Knowledge)
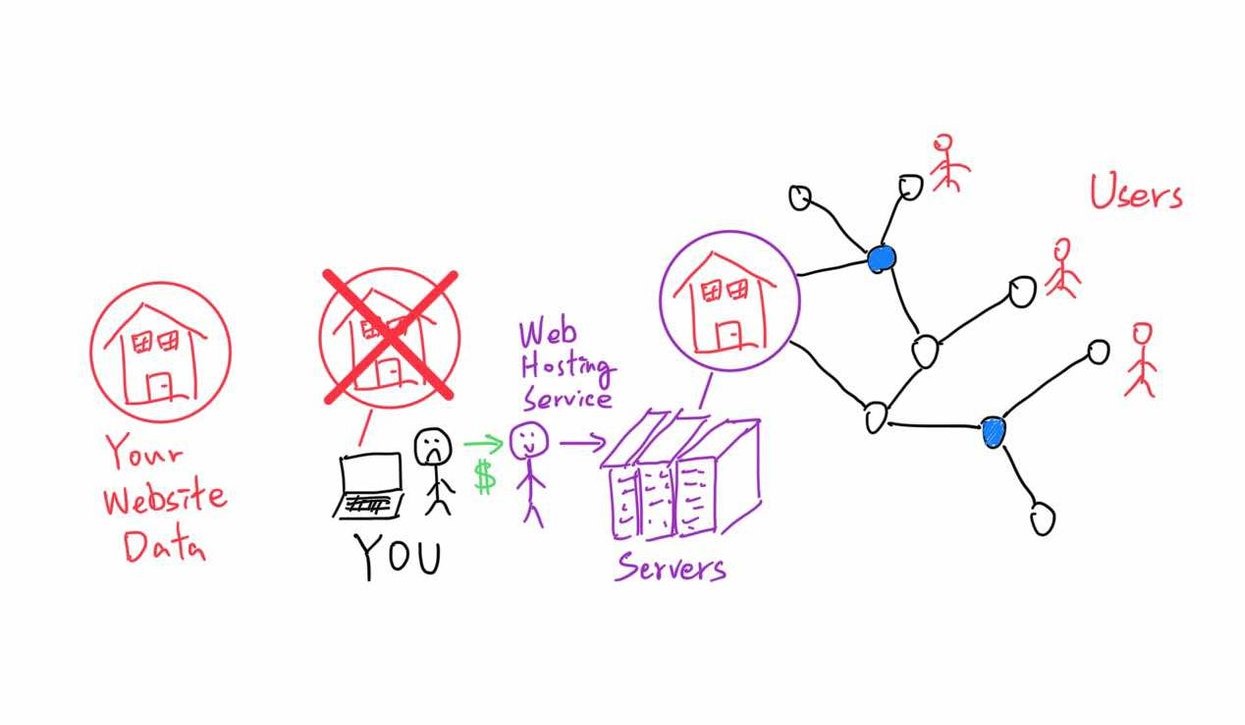
You have a website (which is essentially a bunch of data, including code and images) that you want to put on the internet. You need a computer connected to the internet to host your data (website) so that everyone can see it. At this point, when someone wants to view your data (website), they just need to connect to your computer through the internet, and they can see your data (website). However, there’s a problem: your computer is usually not always on. Even if it were, what if 1,000 people wanted to view your data (website) at the same time? Your small and cute computer might not be able to handle it. If you’re lucky, everyone can still see your data (website), but they might have to wait a long time; if you’re unlucky, your computer might crash, and no one would see anything🙈.

This is where you need to enlist the help of professional companies; this service is called Web Hosting Service. They help you host your data (website) on their servers. These servers not only stay on 24/7, but they also have more hardware resources, such as CPUs, memory, etc., ready to serve your data (website) to anyone at any time. Although web hosting services’ computers are much more powerful than yours, they usually don’t have enough computers to cover the entire world. Suppose your web hosting service is located in the U.S., and someone tries to connect to your website from Taiwan; it would take some time for the data to travel from one end of the Pacific Ocean to the other, resulting in a longer loading time.
This is where web hosting services pay another professional company for help, called Content Delivery Network (CDN). These companies specialize in setting up servers worldwide and caching copies of the web hosting service’s data. When someone in Taiwan tries to connect to a website hosted in the U.S., the user can directly get the data from a CDN server located in Taiwan, allowing for faster browsing. For more information, you can visit a CDN provider’s website for a detailed introduction: Cloudflare - What is a CDN?

Architecture Explanation

- Website data/version management - GitHub Repo
- Website deployment + hosting service - GitHub Pages
- Private domain (optional) - Squarespace
- Static site generation - Jekyll (HTML, CSS, JavaScript, Markdown)
How It Works
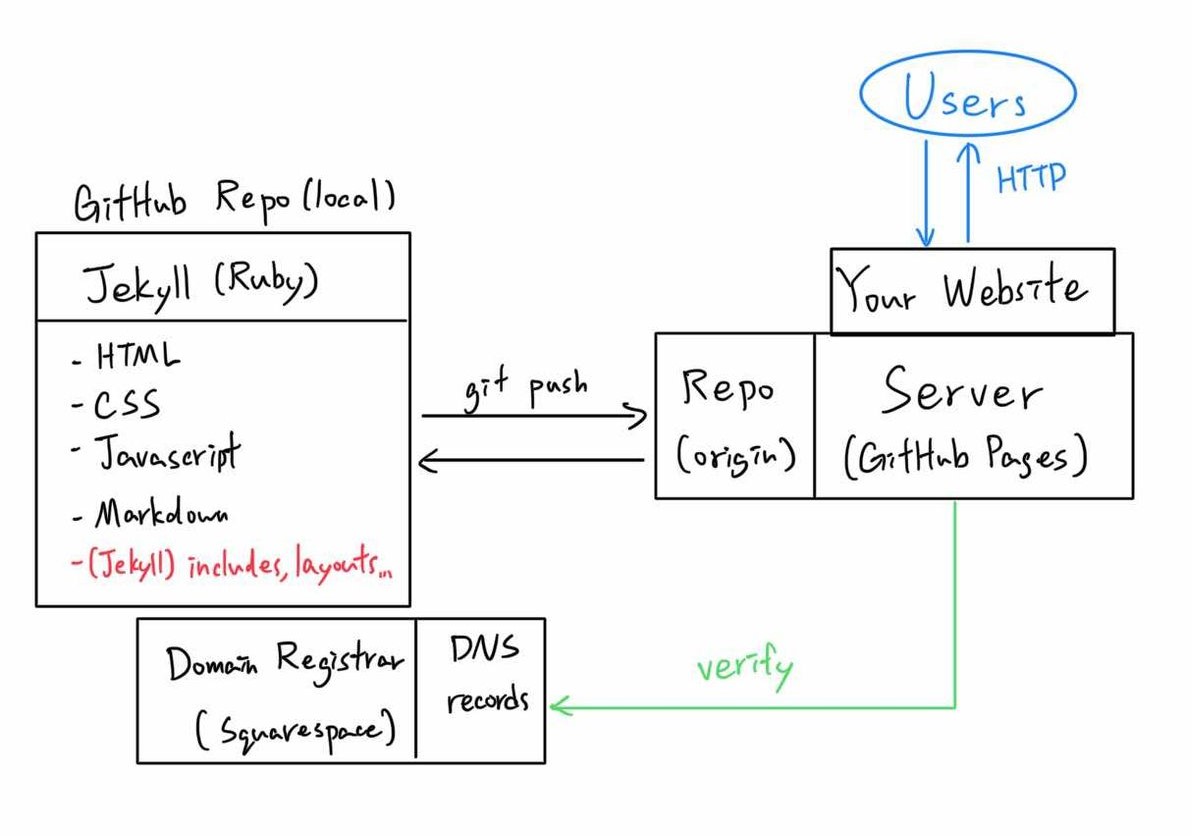
After a brief introduction to the background knowledge, let’s see how to actually build and host a website. The data mentioned earlier, which includes all your website’s code and other files, can be stored in a GitHub Repo, which is somewhat like a project. By using GitHub, you can utilize Git for version control. For more details, refer to What is Git?.
Conveniently, besides storing your projects, GitHub offers another service called GitHub Pages, which is a free web hosting service provided by GitHub. GitHub Pages is well-integrated with GitHub Repo, so as long as your Repo’s folder and file structure meet the format requirements, every time you update your website, GitHub Pages will automatically deploy your site. Deployment means taking your updated data and putting it online.
Reasons for Choosing This Architecture
- Convenience of the GitHub Ecosystem.
Because GitHub offers free tier services, it allows you to manage your website’s data and use the GitHub Pages web hosting service. Moreover, I already use GitHub Pages to host my personal online resume. - A static website is sufficient to create a fully functional blog,
without needing to use other more powerful but also more complex architectures like front-end frameworks: React, Vue.js, Angular, or back-end frameworks like Django, Flask, Express.js, etc. (I’ll discuss the differences between static and dynamic websites in another article). - Jekyll is a free static site generator,
and it has many free templates, including common blog features, allowing me to complete the task with minimal time and effort.
Deploying the Website (GitHub Pages)
For deploying your website via GitHub Pages, I recommend reading the official documentation directly; it’s quite clear: GitHub Pages Quickstart. One thing to note is that if you want to create a subdomain, you’ll need to create a separate repo. For example, my website includes kyleptlin.com as my online resume, and the subdomain blog.kyleptlin.com as the blog. So, in my GitHub account, there are two repos linking to these two domains.
Private Domain (Squarespace)
Without a private domain, the default GitHub URL is {your_github_id}.github.io. If you want to use a special URL, you need to purchase it from a domain registrar. Most domains are quite affordable; for example, I bought my personal domain through Squarespace for $14 USD per year. Different countries may have different domain registrars, but some seem to support global registration. Other domain registrars include: GoDaddy, namecheap, etc.
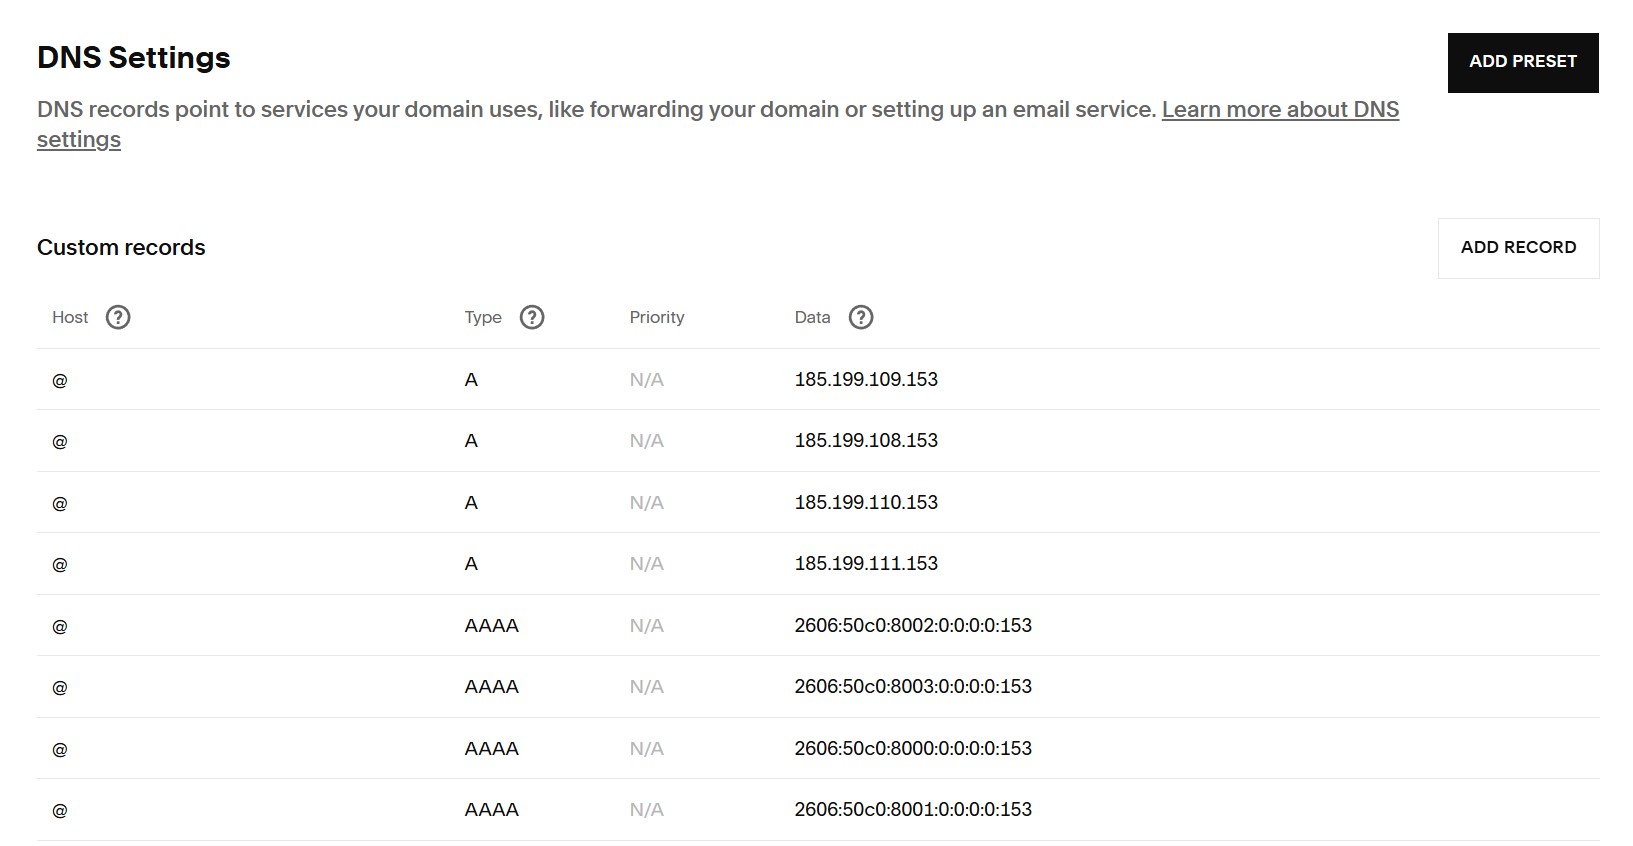
After purchasing a private domain, you’ll need to perform DNS verification through GitHub. GitHub will give you a verification code, and you’ll need to add a DNS record via your domain registrar so that GitHub can verify that you own the domain. Then, since you’re using GitHub Pages as the web hosting service, you need to add some DNS records to route traffic from kyleptlin.com to GitHub’s servers. For detailed settings, refer to GitHub Pages - Managing a custom domain.

Static Site Generator (Jekyll)
Jekyll is an open-source, free static site generator that primarily helps you efficiently manage various assets on your website. For example, a static website might have 10 different pages, each of which could be an HTML or Markdown file containing the page’s text content. Jekyll uses layouts to template the pages and apply the same layout to all pages that belong to the “blog post” category. This ensures consistency across your website; if you change a layout, the change will immediately apply to all pages using that layout.
Additionally, Jekyll has includes, which allow you to organize reusable code into components that you can easily insert into any page. Jekyll accomplishes these functions mainly through a template engine called Liquid, which lets you use variables in HTML or Markdown files. For more information, please refer to Shopify - Liquid.
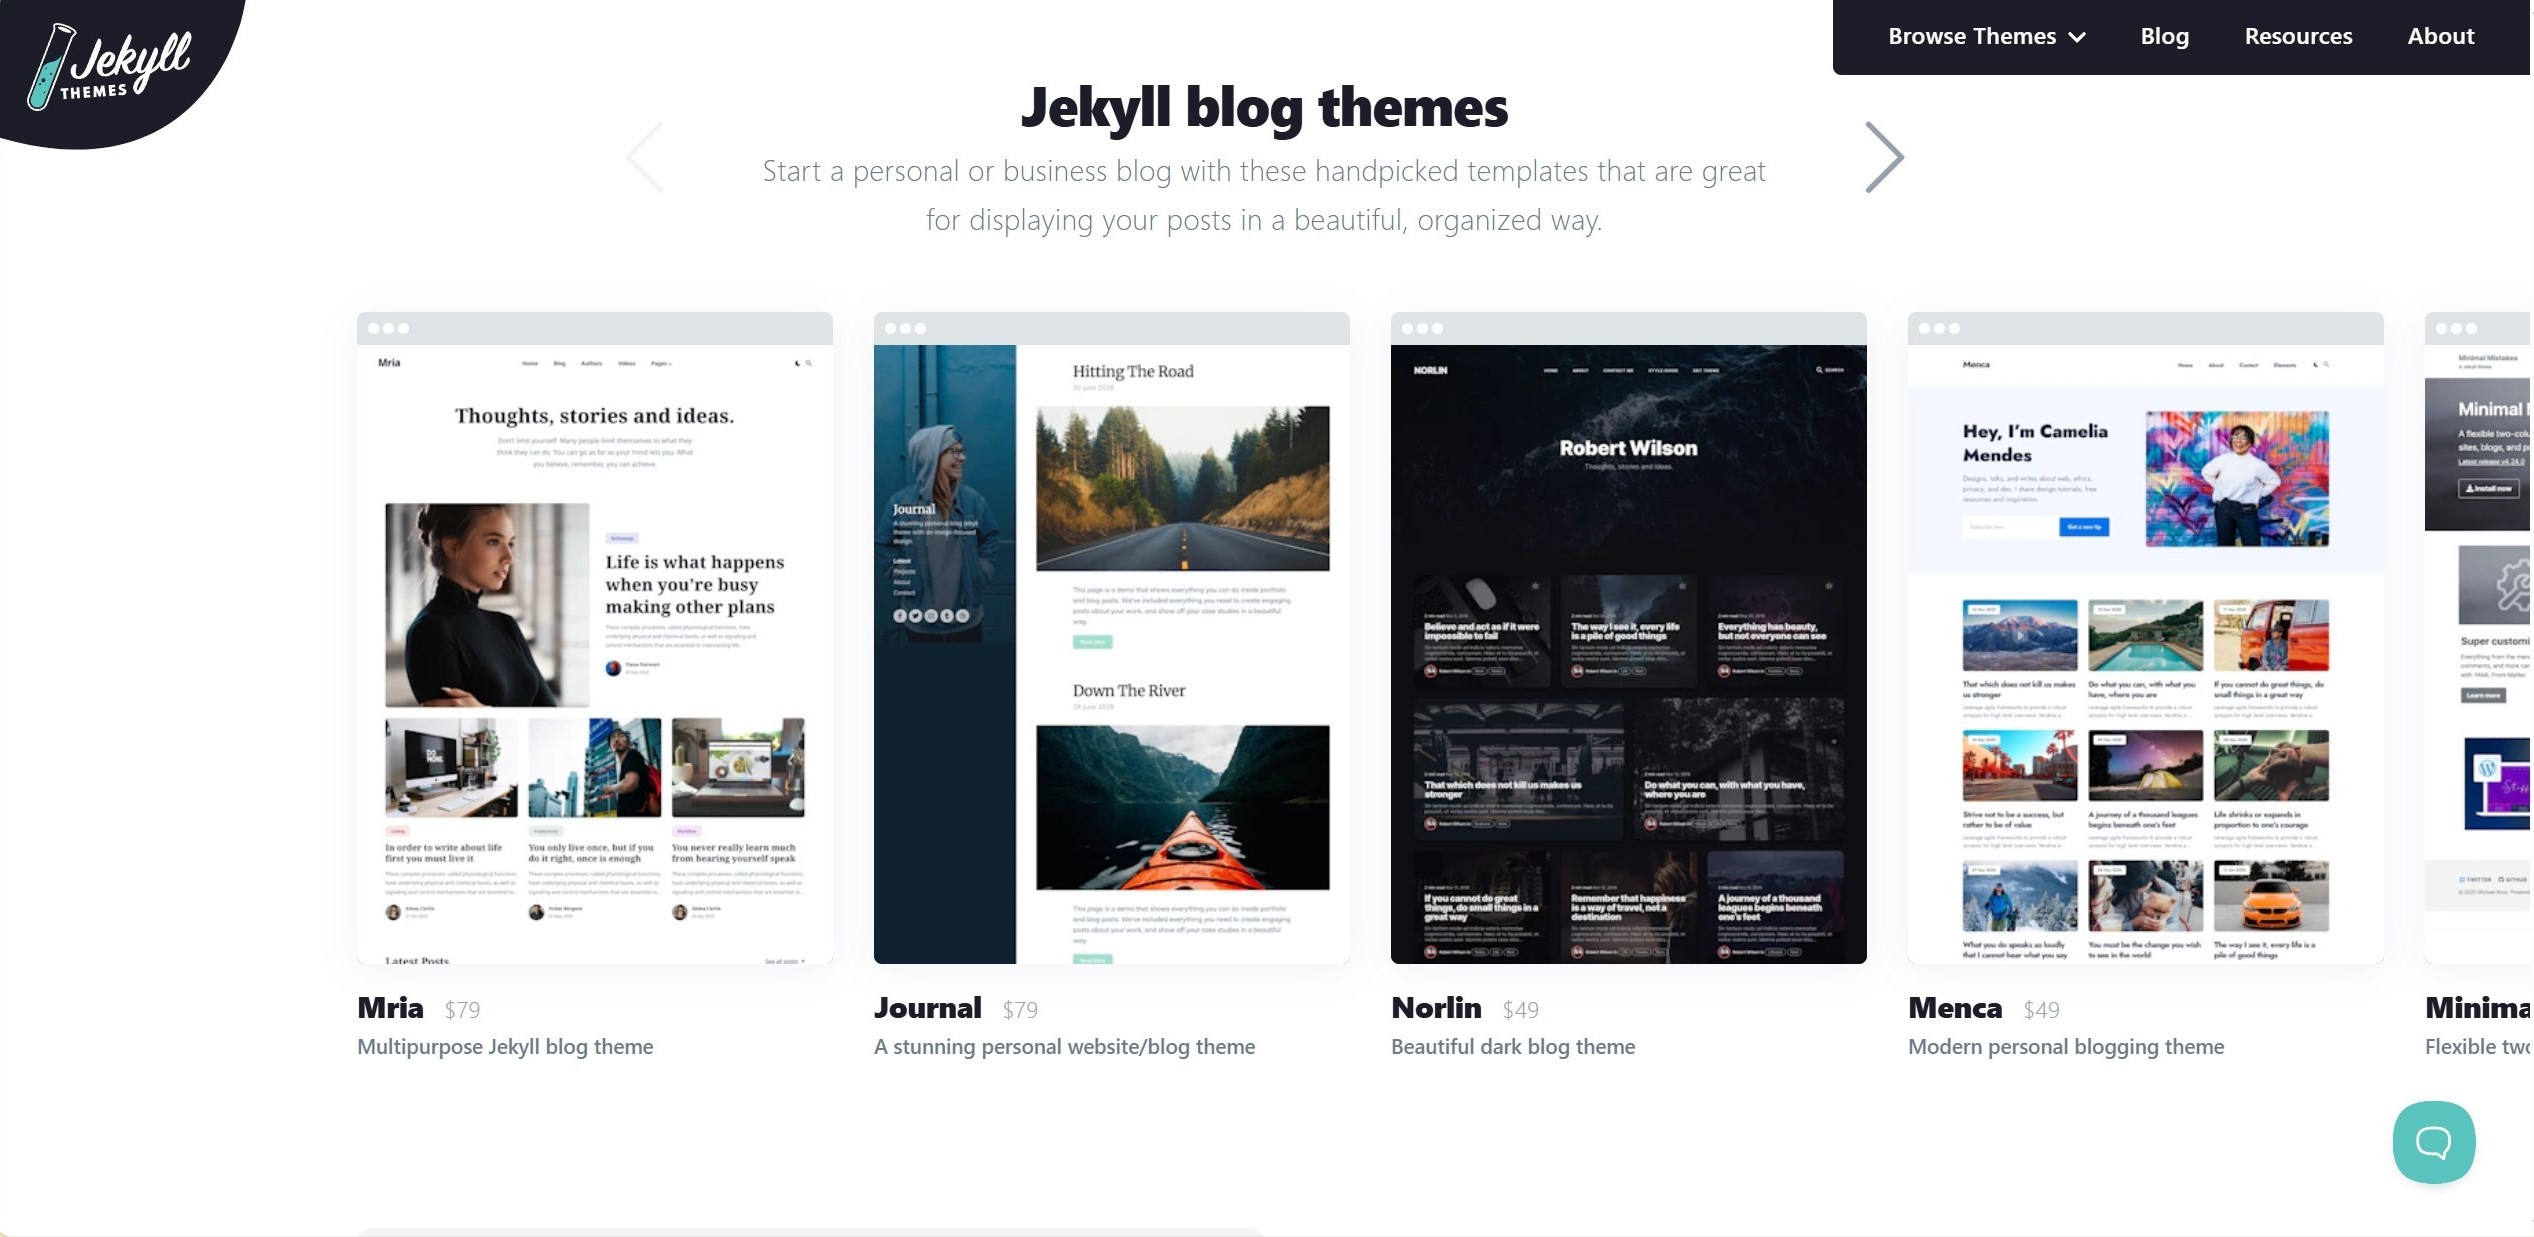
I first followed Jekyll’s getting started guide to install the necessary software and get a general understanding of the features and how to use them. Then I downloaded a free template and customized it with the features I wanted. Many web designers specialize in designing templates for Jekyll, and there are plenty of free templates available, saving you time on designing the website’s appearance!

Third-Party Plugins (Optional)
- Google Analytics:
This is a free service provided by Google. By inserting a piece of code into your website, you can monitor various user visit metrics through the Google Analytics dashboard. - Google Search Console:
Another free service from Google. After DNS verification, you can track various data on how your website performs in Google searches. - Disqus:
Disqus provides a commenting system and social media integration. If your usage isn’t too high, you can use the free tier. Typically, a comment system requires backend support and a database, which static websites lack. With Disqus, developers can easily add a comment section. I’ll write an article on the differences between static and dynamic websites at a later date.
Other Custom Features
If the Jekyll template doesn’t offer enough features, you can try writing some additional features yourself. For example, I wrote two JavaScript files to calculate and display the relative publish time of each article (e.g., “an hour ago,” “three days ago”) and the required reading time (“x min read”). I’ll write another article introducing these features later.

Thoughts on Architecture Design
I believe that for software development, architecture design is extremely important. With a good architecture, all other problems can be easily solved. It’s like assembling a puzzle. The internet is full of various tools (puzzle pieces). First, you need to identify the pieces that can create the final picture you want (your blog). Once you’re sure the pieces you have can form the picture you want, the rest is just connecting the pieces and assembling them.
Initially, I considered other architectures, like a full-stack solution, but quickly realized that a blog doesn’t need anything that complex; using such a powerful solution would be overkill and a waste of resources and time.
When designing the architecture, I often relied on ChatGPT, which helped me identify the most common framework combinations. If I had questions about how to connect two pieces, it provided very helpful answers. I’ll write an article on how I use ChatGPT to solve various programming problems later.
When designing an architecture, there are many factors to consider: functionality, complexity, learning curve, the size of the developer community, time cost, and monetary cost.
Functionality and complexity are often inversely related: the more features, the more complex the system, and the steeper the learning curve. When choosing a framework, consider your current (and near-future) needs, ensuring that your choice meets your needs without being overly complex.
The size of the developer community is also crucial because it determines whether you can find solutions online when you encounter difficult bugs.
Finally, time and money costs depend on your project’s budget. Many software frameworks are free and open-source, but some use a freemium model where advanced features require payment.
In conclusion, I believe the best architecture design is one that perfectly meets the user’s needs, not too much nor too little. The user could be yourself, your boss, your company, or your customers.
Closing Remarks
I initially thought I could finish this article quickly, but I ended up spending a lot of time explaining various things and even drawing some crude diagrams on my iPad. I hope they are somewhat helpful! (If anyone actually reads to the end…)
The architecture I provided is a solution that works well and efficiently for me, and I don’t think it would be too difficult for someone with some programming background. But as I mentioned at the beginning, if just reading this article made your head spin, I recommend using a paid platform instead 🤣. If you’re still determined to build your website from scratch, I wish you success!
Although you will likely encounter some obstacles along the way, solving the problems step by step and finally assembling the website yourself will bring you a great sense of accomplishment (I hope).🙂
